
During my Senior year at DigiPen Bilbao I worked with Unreal Engine 4.16 to develop Fast Food during 8 months.
UE4 is a huge engine with a lot of really useful functionalities, one of the main issues I find when starting to work with a new program/editor/engine is that is hard to find the correct tool/path that makes everything much simpler. There are so many features that finding the proper one is almost like looking for a needle in a haystack.
In this post I have collected some of the tools that I found most useful as well as Tips & Tricks about what was more tricky to find answers to. Just to be clear, this is NOT a guide about how to start using unreal. This post just contains bullet points of what I found most interesting about it.
Note: Unreal engine is being updated with fixes and new features always, this is just a small list as an introduction to the ones you may find useful when start looking into the engine. For more details check the main reference page.
Tools
Editor features
- Right click on assets in content explorer
- “Asset actions > Bulk edit via property matrix” allows you to change properties of multiple assets (i.e. meshes, rigs, textures…)
- Reference viewer: allows you to see dependencies between all types of assets.
- CAN COPY PASTE EVERYTHING
- One of the best features, before you start copying properties, blueprint nodes, material nodes… by hand. Try a right click and check if there is a “Copy” option, it will save you a lot of time 😀
- Apart from being able to copy paste around in the editor, everything that can be copied can also be pasted as text in a text editor. You can send it by email or store small tests in .txt files.
- Redirectors
- Viewmodes, there are two main types:

- Rendering related Viewmodes: View data of the different render buffers.
- Optimization Viewmodes: Visualize rendering complexity of the scene.
Windows
The tools described under this category can be found under the “Window” menu in the top left corner of the editor window.
Level

This window shows you the maps that are part of the current Level. Perfect tool to work in parallel, we mainly used two maps per level, one of them with all the gameplay elements and the other with the decoration. Artists could work while gameplay was polished.
Note: Objects can only store property references to objects of the same map.
Statistics
Nice way to get info about the level. What meshes, textures, objects, etc are consuming more of your budget.

Merge Actors and Meshes
Can merge multiple actors into a blueprint just selecting them in the level, right click, “Merge Actors”.
Apart from being able to merge actors, meshes can also be combined into a single one, this can be used to reduce number of meshes/objects that need to run culling algorithms and/or be rendered. On the other hand, we need to pay the price, will increase memory consumption (i.e. merging mesh A+B and A+C duplicates mesh data of A).
Blueprints
My first thought: I don’t want and don’t need to use this, I’m a C++ hardcore developer!
The reality is very different. I ended up liking and using them in a lot of places. They allow you to create simple logic faster than with code, you just need a couple of clicks here and there and done! On top of that, blueprints give you the possibility to create some logic in a much cleaner manner than using code, here goes an example:
Performing actions with an small delay is supper easy! Imagine this code in C++, you would need to create branches and variables for a really simple logic. (In C++ you could also set up some callbacks without the need of creating or needing branches, but the flow of the execution, in this example, is much clear in blueprint)

But blueprints have their disadvantages too, something that starts small can grow really quickly. As when coding, keeping your work clean is important! Believe me, spaghetti blueprint is worse than spaghetti code… Here are some tips to make blueprint graphs cleaner:
- Knowing about the FlowControl blocks that Unreal provides.
- BlueprintPure functions are functions that do not have in/out signal tokens. Reducing significantly the graph noise. You can specify that a function is Pure in both C++ and Blueprint functions.
No BlueprintPure VS BlueprintPure


- Blueprint Macros: can make graphs much simpler, the difference between Macros and Functions is that Macros can have more than one signal input and output points. One of the most commonly used Macros provided by unreal is IsValid,as in C++ we want to check if an object (pointer) is valid.
We can do it calling the the IsValid function and using a Branch:

But we need two nodes! Is better to use the IsValid Macro, is just one node and output execution pins have descriptive names (Is Valid & Is Not Valid):

The best part about Macros is that we can create our own ones, the IsValid macro is implemented by unreal, we can see it right clicking in the node and selecting Goto Definition:

This is the implementation:

Just to give you an idea about how powerful Macros (and blueprints in general) are, here are some examples of Blueprint nodes provided by unreal implemented using Blueprints:


And those are also examples of how messy blueprints can end up being. True spaghetti!
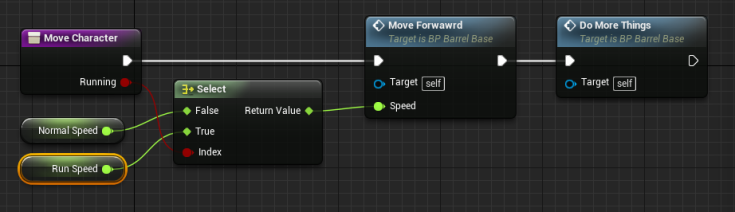
- Select node: Allows you to select between two values in a very clean way.
Imagine this situation:

This is how it looks like with Select node:
Blueprint debugging
Apart from the tips about clean graphs listed above, you may want to know about the Debug filter, which allows you to select the instance you want to debug. Very helpful in bugs that only occur in some complex scenarios where multiple objects are taking part.

Console commands
Pressing Tilde key (bellow Scape in the keyboard) , the console can be opened. Complete list of commands. This are some of the commands that where more useful for me:
- stat startfile : Start profiling application
- Need to call `stat stopfile` to stop profiling.
- Results can bee visualized using the Unreal Profiler Tool
- stat fps : Show FPS number in screen
- stat unitgraph : Show graph with the cpu time logic(cpu), render(cpu) and render (gpu) needed.
- stat scenerender : Show statistics about scene rendering, time it takes for each operation, number of elements processed…
Working with C++
Searching for info
When looking for references about an specific engine class, searching by “UE4 ” gives you as the first result the reference. Try searching: “ue4 UPrimitiveComponent” or “ue4 APawn”.
While working with UPROPERTY and UFUNCTION, those links are your best friends 🙂
Build Configuration
Is NOT done through the VS solution file! Still, is pretty simple and intuitive to work with. You need to modify the .Target.cs files in the Source folder of your project, here you can find a reference with all the configuration options you have.
Actor Lifecycle
Here you can find a detailed graph of the process that an actor follows while being spawned.
Tips & Tricks
Project Organization
We used the asset naming convention and folder organization suggested by unreal here.
In order to create filters in the Visual Studio solution you need to organize the files as you want in the windows explorer and click on the top left of the editor File > Refresh Visual Studio Project or right click in the .uproject file and then Refresh Visual Studio Project.
Packaging
Error: (…) has an inappropriate outermost (…)
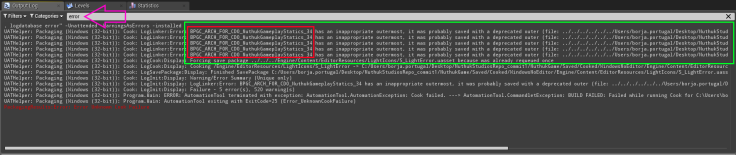
This error happened often while packaging the project, the way I managed to solve it was:
- Open the blueprint that appears in the error (red rectangle in the image)
- Make a dummy change
- Save
- Re-package again
Scrolling to the right, there may appear an other blueprint, do steps 1-4 in that blueprint too.
Blueprint Nativization
Blueprint Nativization is a feature that converts blueprints into C++ code and compiles them as part of your game. This can speed up significantly execution of blueprint logic.
We ended up not using it because it was introducing bugs and glitches. Not sure if we where doing something wrong or not, but everything was working fine without nativization so we disabled it. On the other hand, sometimes nativized code doesn’t compile (bug in nativization process), C++ knowledge is needed to check the code generated and/or check compiler errors and then modify the blueprint to workaround the problem (in any case, with time all this issues will be fixed in UE4 side).
Redistributables
Unreal provides an .exe in the package folder with all the dependencies needed to execute the game.The path where the resdistributables are is “PackageFolder\Engine\Extras\Redist\”.
About Performance
In general, some typical things to do no matter what engine you are using are:
- Set as many objects as you can to static.
- Disable dynamic shadows in objects that don’t need them.
- Disable collision/shadows of dynamic objects that do not need them (i.e. decorative props such as spinning vents)
- …
Even if you take into account all this “generic” bullet points, not being aware of what Unreal Engine is doing underneath, is easy to end up wasting a lot of computation power due to simple mistakes. This is one of the things you should be aware of:
- Calling SetActorLocation is NOT a trivial operation! Moving an object makes it trigger collision checking and sends events. This mean paying a big cost each time you call it and on top of that, can generate logic bugs! We had a similar situation to this one:
SetActorLocation( new_pos ); // If player here is touching lava, collision will be triggered and player will die
if( Jumping() )
    SetActorLocation( new_pos + up_offset ); // This correction was made too late, player is already dead
Tip: There are two view modes called “Player collision” and “Visibility Collision” that show the collision shapes of the objects and uses different colors for static and dynamic ones. This is useful to find dynamic objects that should be static and correct them. Only drawback of this tip is that objects with no collision won’t be seen in this view mode, so there may be objects casting dynamic shadows when they should be static.
Thanks for reading!
I hope this post was somehow useful to you, feel free to drop me a line if you want to discuss something else about Unreal Engine 🙂

Great tips! I am new to Unreal and I get some good insights from this article!
LikeLike